A study guide to the methodical order of pieces in Suzuki Violin Book 1 (with video examples).
Suzuki Violin Book 1 imparts the essential techniques and musical concepts needed to prepare students for more advanced violin playing. In this article, I’ll explain my main pedagogical takeaways for each piece in Suzuki Violin Volume 1. Each piece systematically introduces something new and gives students an opportunity to develop what they learned in previous pieces.
Remember, before starting Suzuki Violin Book 1, students should have already learned Pre-Twinkle Pieces. My previous article describes how Pre-Twinkles help students learn the basic foundational violin skills.
You can purchase the sheet music for Suzuki Violin Method Volume 1 here. The official Suzuki recordings by Hilary Hahn can be purchased here.
I’ve compiled what I believe to be the main teaching points in each piece in Suzuki Violin Book 1.
1. Twinkle Variations and Theme
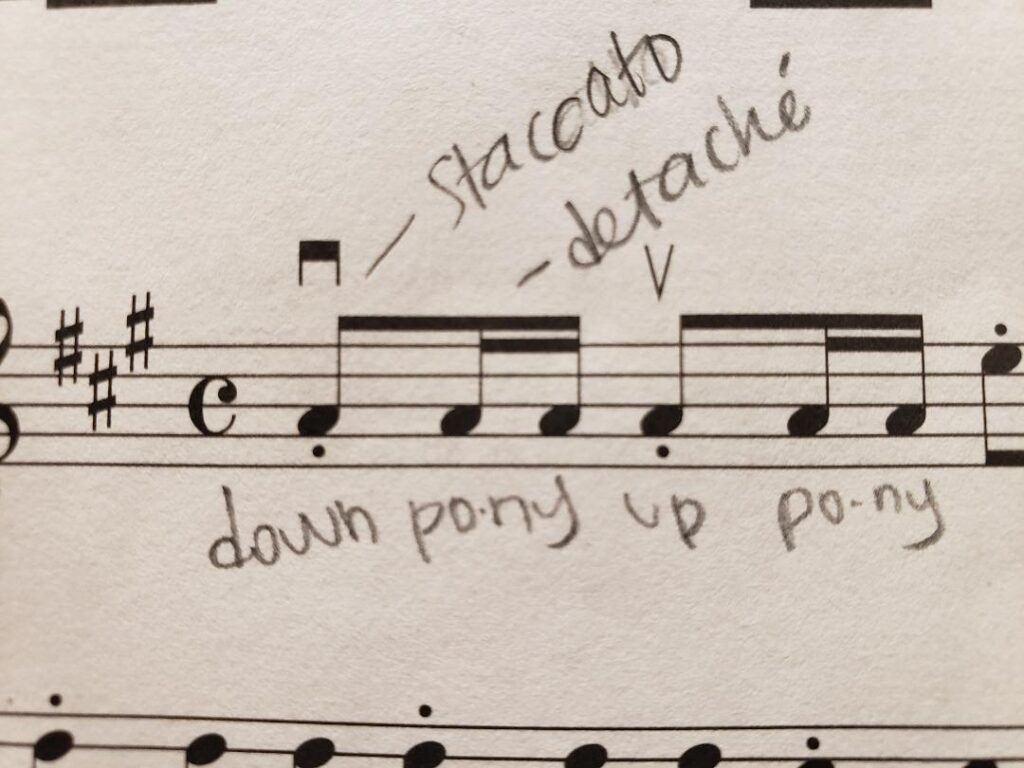
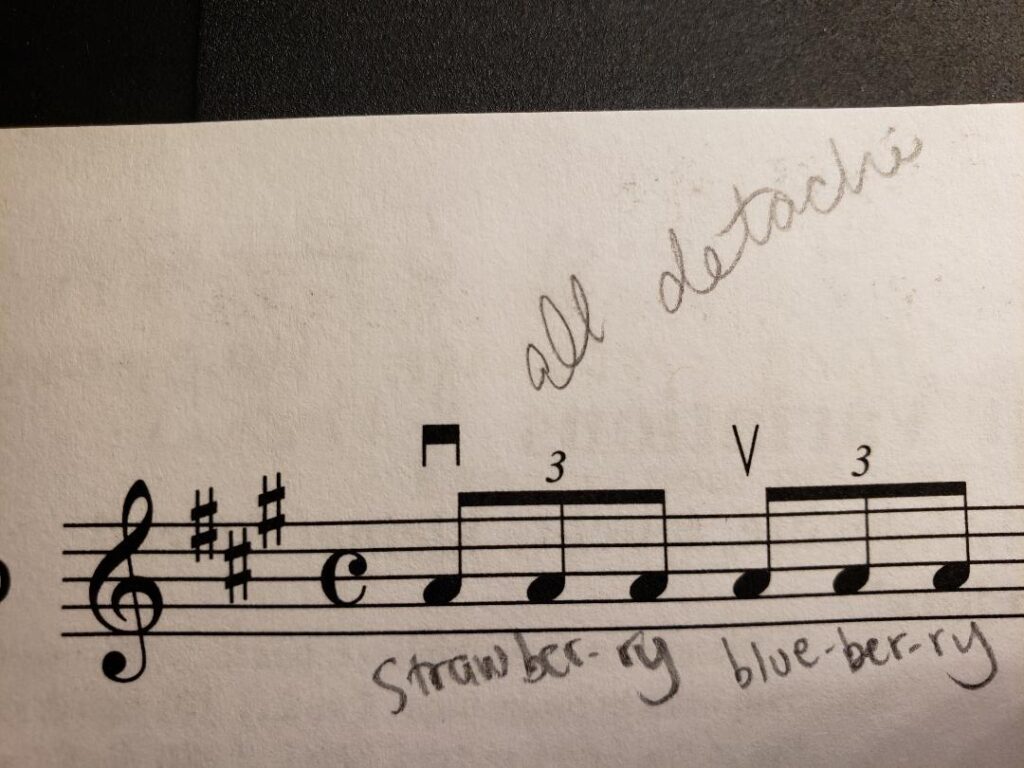
While Pre-Twinkles helped students establish their posture, left-hand frame, and bow technique, the Twinkle variations give students an opportunity to further develop these skills. In each variation, the student applies new rhythmic concepts to the Twinkle melody. These variations also teach students that repetition is a crucial aspect of learning the violin. There are two types of bow articulations in the Twinkle Variations and Theme: staccato and detaché. Students should become familiar with those terms and learn to identify the sounds of the articulations by ear.
5 Twinkle Variations
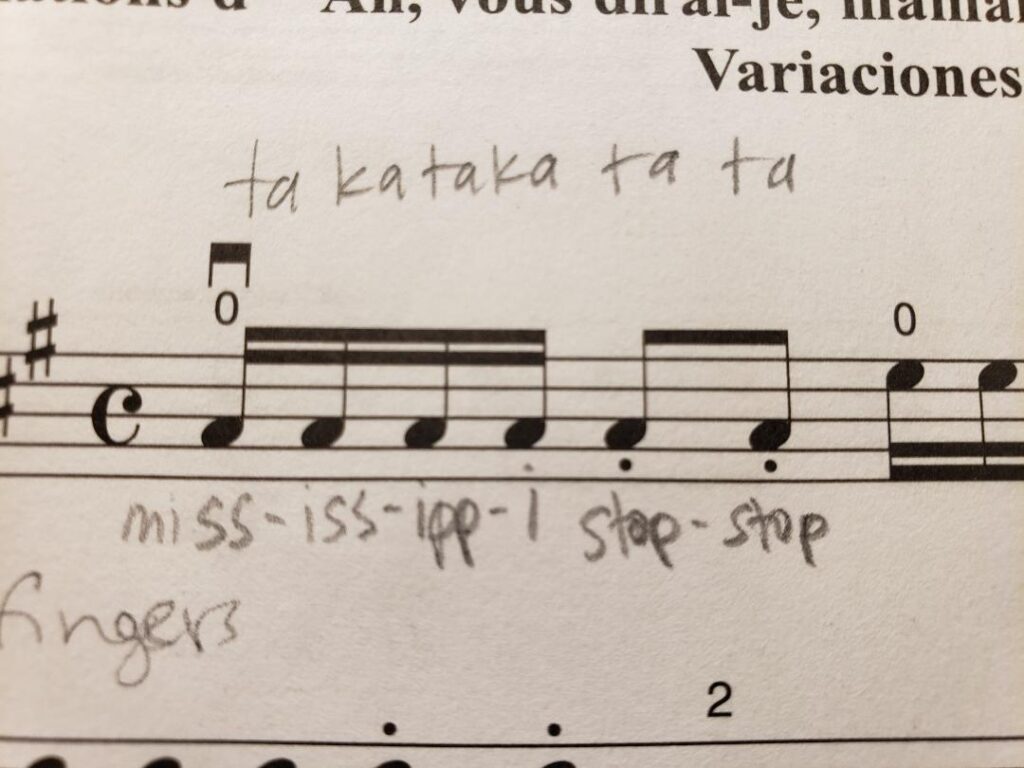
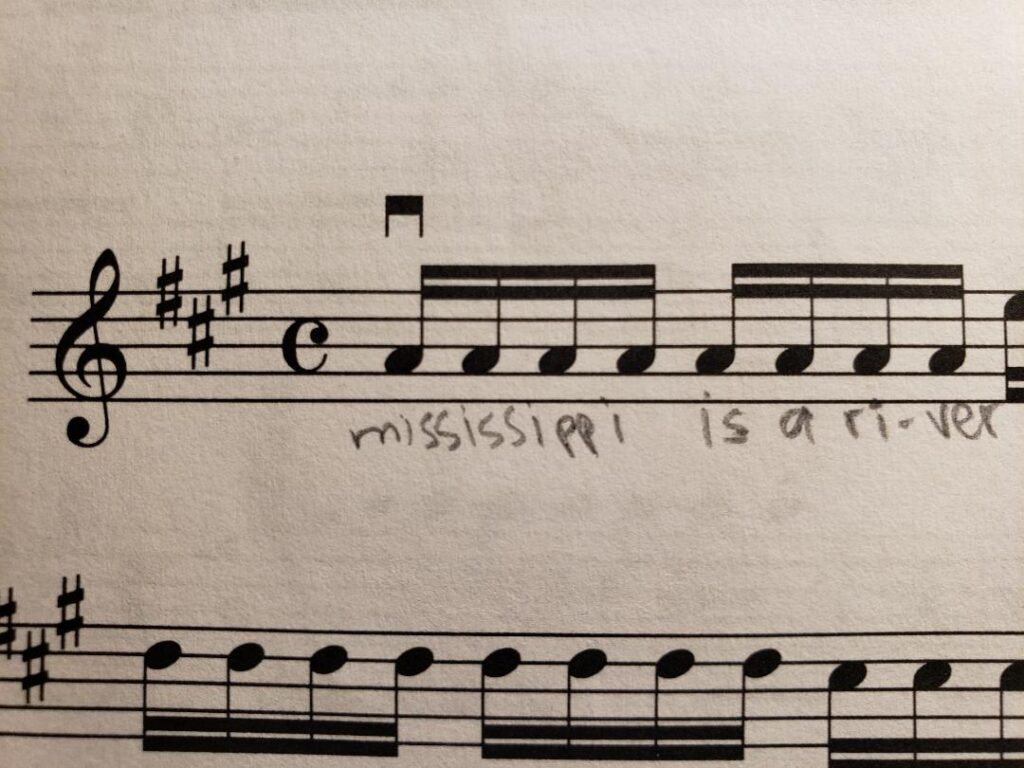
Twinkle Variation A is a combination of detaché and staccato bowing. In this rhythm pattern, the 16th notes are detaché, and the 8th notes are staccato. This rhythm is derived from the opening of the Bach double concerto.
In my opinion, Twinkle Variation B is the trickiest variation due to the 8th rest. Additionally, each set of notes alternates starting down bow and then up bow. The bow direction changes can be tricky for young students, but once it “clicks”, they will never forget it.

Variation C is, like Variation A, a combination of staccato 8th notes and detaché 16th notes.
Like Variation C, Twinkle Variation D has 6 bows per note. This similarity can be confusing to students. I explain to my students that Variation D contains 6 equal-length notes, while Variation C has long and short notes.
Students should play the 8 equal 16th notes of Twinkle Variation E with a detaché bowing.
Twinkle Theme
It is time for celebration when students reach Twinkle Theme. Some students easily pick up on the familiar melody and rhythm of the piece. However, other students need some explanation that each phrase ends with one long note, rather than a down-up stroke. Singing the traditional lyrics can also help students understand the rhythm of Twinkle Theme.
It is important that students can play Twinkles with good posture, intonation, tone, and hand positioning before moving on to other pieces. Students may return to Twinkles at any time during Book 1, whenever they need to refresh their foundational techniques of posture, bow hold, and left-hand frame.
2. Lightly Row
Teachers may turn the first two measures of Lightly Row into a left-hand exercise. This will help students get used to the arpeggiated finger pattern of E to C, and D to B. Students should eventually play this piece with a detaché bowing, though at first, they will need to pause between notes and think about the next note.
Students will also need to differentiate the first line from the second line, since they start with the same two notes. Teachers can play the first and second line separately and quiz students on which line is which.
In the third line, students should figure out how many repetitions there are of Bs and Cs.
At this point, students should be able to recognize scales and arpeggios by ear. Teachers can ask them to identify which phrases in Lightly Row contain scales and which phrases contain arpeggios.
3. Song of the Wind
In Song of the Wind, students should play with a short staccato bow stroke. In the 3rd measure, the F#-D-A-F# finger pattern is an excellent left-hand exercise. It is important that students learn how to “hop” the 3rd finger from the A string to the E string and maintain their hand frame, rather than rolling the finger or squishing it down.
Song of the Wind also teaches the technique of bow retakes. Between two consecutive down bows, the bow should be lifted into the air in a circular motion, landing below the balance point before the next note. This is a great opportunity for a mini physics experiment, as teachers can show where the balance point of the bow is, and students can try balancing their bow on their fingers. Landing the bow underneath the balance point after a retake will allow for a soft, almost inaudible landing, rather than a crash landing.
4. Go Tell Aunt Rhody
This piece contains mostly step-wise motion for the left hand. The challenge of this piece is in the right hand – the bow hand. When first learning the notes, it is ok to practice the piece with some spaces between the notes, but as the student memorizes the notes, the bowing should become detaché (smooth and seamless). Some students struggle with the rhythm in this piece. Daily listening to a recording should help students feel the rhythm of eighth notes and quarter notes. Students should to sing along with the recording, adding lyrics if that is helpful, in order to internalize the rhythm of the piece. The more the student listens to the piece, the more quickly they will be able to identify whether they are playing the rhythm correctly on the violin.
5. O Come, Little Children
In O Come, Little Children, students will focus on bow distribution. Students will start in the middle of the bow for the first up bow. Quarter notes take up a full bow, and eighth notes use only half a bow. The last quarter note of each phrase is also a half a bow. This way, each phrase ends and starts in the middle of the bow. Therefore, the bowing pattern for each phrase will be half-whole-half-half-whole-half-half-whole-half-half-half.

Another new technique in this piece is the concept of two consecutive up bows, since the last note and first note of each phrase start with an up bow. This is another reason to make sure that these notes only use half a bow. Some students may need to practice the bowing pattern on the open E string many times before they are ready to add the left hand fingerings.
6. May Song
The new concept taught in this piece is the dotted quarter note, eighth note rhythm. Teachers can add fun lyrics to help students remember the rhythm of the first measure. Keen students might notice that the melody of May Song is just an ornamented version of Twinkle Theme. In fact, students and teacher can play a simple duet of May Song and Twinkle at the same time, to see how they line up. This works particularly well in group class, with the class divided into the Twinkle Team and May Song Team.
7. Long, Long Ago
This is the first song in Suzuki Book 1 that introduces the D string. The D string is introduced by way of the “hopping” first finger from A string to D string. Students will learn that they need to adjust their right elbow level to play with a clean tone on this new string.
The melody of this piece is mostly simple step-wise motion for the left hand, and is played with a smooth detaché bow stroke. There is one bow retake between the 2nd and 3rd lines of the piece.
8. Allegro
In Allegro, the recurring finger pattern of 1-2-3-1 can be a challenge for students who are still developing their coordination. Students should practice this finger pattern slowly, with practice techniques such as using Twinkle variation rhythms for each note. On the contrary, the finger patter of 1-0-1-2-0 should not be as difficult, since students should recognize that particular series of notes from “Go Tell Aunt Rhody”.
In addition to the left-hand coordination, some students will need help with the quarter note and eighth note rhythm of this piece. I use the simple lyrics of “walk-ing, walk-ing, running running walk-ing” to demonstrate to students how the quarter notes are longer than the eighth notes. Students should also note that there are bow retakes between each line. If students will be performing Allegro in a recital, teachers may discuss how to gracefully cue the accompanist after the fermata in the third line.
9. Perpetual Motion
To play Perpetual Motion, students must learn how to use their 4th finger on the left-hand for the first time. In preparation for this piece, students should practice the 4th finger exercises on page 32 to develop the strength and coordination of their pinky finger.
Students should perform Perpetual Motion with staccato bow strokes. The form of the piece is ABCA. Students can learn the doubles variation for extra practice of this piece, though I do not recommend performing the doubles variation in recital.
10. Allegretto
Allegretto introduces the G-string for the first time, by way of hopping the first finger from the D string. Note that the way the new string is introduced the same way as the D string was introduced in Long, Long Ago: with a hopping first finger. This follows one of the Suzuki method principles of teaching a new concept by way of an already-learned concept. The rhythm of this piece is the same rhythm as Twinkle variation C rhythm. The bow articulation of Allegretto is staccato.
11. Andantino
Andantino has the same “Twinkle Variation C” rhythm as Allegretto, and is similar in form. However, Andantino is played with a detaché bow stroke, in contrast to the staccato of Allegreto. There is a slight bow-articulation space between each group of three notes in the A and B sections. Students should play the C section with long bow strokes, with the notes held for full length. The descending scale at the end of the C section should be played with 4th finger. Teachers might review the concepts of ritardando and fermata, and discuss how to execute these concepts in a musically tasteful way.
12. Etude
Etude is the first piece in the book in the key of G major, so students must learn how to use low second finger on the A string and E string to produce the notes C-natural and G-natural. At this point in young students’ lessons, I do a ceremonial removal of the 2nd finger tape, if the student is using finger tapes. Students must now use their 1st or 3rd finger as reference when placing the 2nd finger down.
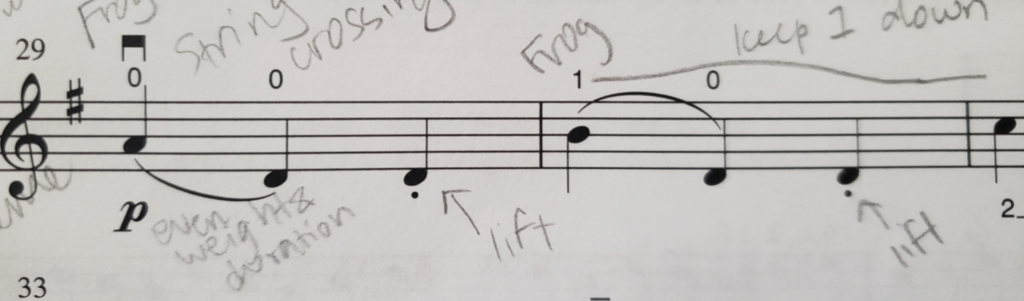
Since Etude’s melody can be tricky for students to memorize, I spend extra time on Etude by challenging students to play the entire piece in four sections of the bow. I use colored tapes to divide the bow into four equal sections. Usually, students find that the section near the frog presents the most difficulty for maintaining a proper bow hold. In addition to offering students extra practice time with Etude, it also serves another purpose of helping students get comfortable playing in all the parts of the bow, which will be necessary in Book 2 and beyond.
13. Minuet I
Dr. Suzuki himself said, “The child’s musical education begins with this minuet, with Bach as his teacher.” Minuet I starts with a down-up-up bow pattern. By now, students should be comfortable playing two consecutive up-bows, which they learned in O Come, Little Children. There is a key change in this piece from G Major to D Major, so students will need to learn where the placement of the second finger changes from C-natural to C-sharp. I encourage students to use 4th finger for all descending scales.
One point of difficulty for students in this piece is the rhythm, which must be precise when performing with an accompanist. I encourage my students to count out loud the full value of the half notes and dotted half notes. Students should cut long notes at the ends of phrases slightly short to make space for the bow retake, however, the student should not to start the next phrase early, so as not to interrupt the piano part.
14. Minuet II
The lengthy Minuet II challenges students’ stamina, as well as introduces a handful of new techniques and musical concepts. In this piece, students will learn about high-third-finger (D-sharp on the A string) and eighth-note triplets. Bow distribution planning is crucial for Minuet II. I teach my students to use small bows in the lower half for the first six eighth notes. Then, we have the down-up-up bow pattern previously seen in Minuet I, in which students may use whole-half-half bow distribution. For the slurred triplets, students should save bow so as not to run out of bow for the third triplet note. In measure 29 and 30, stay in the lower half of the bow, despite the temptation to spend more bow on the slurred down bow quarter notes. Some students will be able to experiment with a slight bow lift after the up bows.
15. Minuet III
It is useful for students to know that the rhythm and bowing pattern in the first measure of Minuet III repeats many times throughout this piece. In addition, the down-up-up bowing pattern, as seen in the previous two Minuets, returns multiple times in Minuet III! There are many instances of slurs over string crossings in this piece. Students should be aware of their elbow motion as they change strings. Teachers may discuss the grace note ornamentation in measure 8 and create an exercise of preparing the first finger before quickly lifting it. Students will need to quickly prepare their bow for the new phrase after the retakes in measures 6, 16, 24, and 32.
The piece starts in G Major and has a key change to D Major in the second section, just like in Minuet I.
16. Happy Farmer
Bow distribution is the main technical focus of Happy Farmer. The first note of each phrase is an 8th note pick-up, which should start in the middle of the bow. The double down-bows and up-bows should divide the bow equally in half. Play consecutive 8th notes, as in measures two and three, in the lower half of the bow. I have labeled the form of this piece A, A, B, A1, B, A1, which has been helpful for my more analytical students. In the B section, notice that the dotted quarter note and eighth note are slurred, rather than slurred staccato. Students should be aware of the slight change in notes between the A section and the A1 section.
17. Gavotte
While teaching alongside other violin faculty at a Suzuki institute, I was surprised to observe many controversies surrounding Gavotte by Gossec. Some teachers insist that it does not belong in Suzuki Book 1 due to its difficulty and length. Sometimes, they will teach it after the student completes Book 2, and sometimes it is not taught at all. In fact, my program director banned it from student recitals for many years. On the other hand, other teachers require their students to learn the piece and perform it in recitals before graduating from Book 1.
I teach the Gossec Gavotte on a case-by-case basis, telling families that it is an optional piece. Some students are ready for the challenge by the time they reach the end of Book 1, and other students are not quite technically or emotionally ready for this piece, in which case we delay it until the student has finished Book 2.
Previous pieces already introduced many of the tricky technical aspects of Gavotte. Grace notes were seen in Minuet II, double up-bows as early as O Come Little Children. However, I believe the trickiest challenges in Gavotte are the slurred 16th notes, especially those which include a string crossing. Of course, execution of the pizzicato at the end of the page will require some explanation and practice.
This piece also includes a D. C. al fine, which offers a great opportunity for students to learn about “musical roadmaps” at this point. Due to the length of this piece, teachers should make sure that students have the stamina to play it all the way through before allowing it as a recital piece.
Looking to go deeper with Suzuki Violin Book 1?
If you have comments, questions, or general feedback on this post, feel free to send me a message. I’m always happy to connect with violin teachers and students.
If you are interested in violin lessons, please send me a message to set up a consultation. I have found joy in teaching online lessons to beginner and intermediate adult violin students from around the world. I typically teach adult students the Suzuki curriculum and integrate other supplemental material as needed.
Questions, Comments, or Lesson Inquiries?
Send me a message!

Kiyoe Matsuura is a violinist and violist based in Chicago. As an educator, she has helped hundreds of students develop their musical talent in individual lessons, group classes, and classroom settings over the past decade. Her freely available pedagogical content online has reached students around the world. She has completed Suzuki teacher training in Violin Books 1-5 and is an active member of the Suzuki Association of the Americas.
Recent Posts from the Blog
5 Practical Gifts for Violinists In 2025
Over the holidays, I started thinking a lot about different types of practical gifts for violinists.…

How To Do a 180° Career Change As A Classical Musician
As a musician, I’ve had moments of wondering what life would be like to go through a career change. …
What It’s Like To Fulfill Your Parents’ Musical Dreams
With discipline, talent, and passion for orchestral music, 32-year-old cellist Sonia Mantell has alr…

How To Treat Violin-Related Pain and Injuries With Sotai
For violinists who have struggled with playing-related pain despite trying countless remedies, a Jap…

How To Build A Nationally-Recognized Non-Profit Music Ensemble
Starting a non-profit music ensemble is a dream shared by many musicians, but turning that dream int…
How Friendships and Passion Shape A Meaningful Life In Music
Have you ever reflected on the values that guide your career as a musician? Pianist, harpsichordist,…